Over the weekend I did a bit more towards the hutch in Julian however I didn't do as much as I planned as Sunday I was too hung over from the penultimate whisky night on Saturday night.
There's another "for the last time" to do; not for a while yet.
Anyway, Saturday I woke up bright and early and waited until about 10am so as not to annoy the neighbours with my use of power tools. My target for the day was to hang the door on the bottom half of the hutch however before I could do this I realised that I needed to finish of some of the framing.
 |
| Fixings for the middle of the door frame |
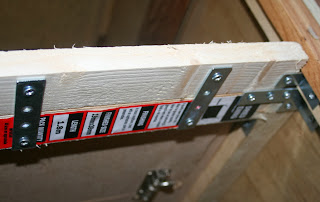
As my plan is to have two doors, one solid below and one with metal mesh above, I need to have a divider between the two so they have a snug fit. This will keep them rigid and make it all last longer.
 |
| Firmly fixed |
I used for straight fixings and then, to add more rigidity, put a couple of right angle fixings on for good measure, one at each end. If only I could have got a photograph taken of the contortions I had to go through to fix this in place; I was laying on my back with my legs over the back of the drivers seat and my head inside the hutch. Then I had to reverse my position to get easy access to the other end. I really need to get fitter as I found this quite hard work.
I'm satisfied though as this support is now just as solid as the rest of the build.
So after this I took myself over to B and Q as I had a few bits to get; some hinges, some catches and the metal mesh for the top door. This trip was very successful and I bought everything I needed, including finding a tool box on sale which is perfect for me so I picked that up too.
 |
| Hinges mounted on the frame first |
As soon as I got back I set to with the challenging task of putting the hinges on and attaching the door so that it would open easily. As you can see after a bit of thinking I decided to mount the hinges on the frame first, not the door. I'm not sure if this was the best way of doing it but never mind that's just what I chose.
Having fixed the hinges I realised that I could use these same hinges (with their slightly shorter screws) for the ramp and remove the unsightly wooden blocked I had mounted to stop Sassy from catching herself on the protruding screw ends. This was achieved very quickly and I also changed the size of the screws which were holding the shelf down as the ones I had used before were a little short and hadn't quite bitten securely into the frame.
 |
| Guide holes |
Next I had to mount the door onto the hinges and here I started questioning my hinge-on-frame-first decision. It took me a fair amount of time to get the door lined up satisfactorily and then I had to mark where my screws were going and go and start off the holes as it was impossible for me on my own to hold the door, the hinge, the screws and the screwdriver while attempting to start a hole all at the same time.
 |
| Hinges in place |
Finally after much hassle and juggling and dropping and cursing I managed to get the first screw in fully and then it became easier. For the next one I think I may attach the hinges to the door first and then the frame - I may also try and get some help so I'm not juggling with things quite so much.
So the door was hung and now I needed to use the catch I had bought to keep the door shut. I had spent a fair amount of time perusing the options at B and Q. For a while I was tempted by a roller catch but decided that it could be pushed open from the inside and I know just how clever rabbits are at escaping. Because of this I chose an externally mounted catch.
 |
| Shiny lovely catch |
This part was quite easy, apart from initially I put the hook part too far to the right and so I had to move it slightly (you can see the screw hole in the picture showing I was out by about 5mm).
 |
| These will need cutting off |
The last thing to do was to use a hacksaw to remove these little bits of screw just sticking through from the catch. This was the work of a couple of seconds and the door was mounted successfully.
As I have said I had planned on doing the other half of the door today (yesterday as you read this) but my hangover had kicked in and I spent the day reading and hiding from anything remotely resembling work. I will now have to complete this on Monday.
 |
| D'awwwwwwwwww |
Sassy is a lucky bunny!


No comments:
Post a Comment