I am just back from the studio after having had a fantastically productive couple of days sorting things out in the storage unit. It has really come into his own and proven what a sensible idea it was to take it on as the weather has broken (as you will all know) however I have been inside, sheltered warm and dry and with the shutter down and the arc lights on I have been able to just keep going through all the dramatic wind and rain.
Anyway, that is getting ahead of myself.
I have been trying to do overtime for work this holiday and it has been going a bit badly; first of all I left my hard drive at the studio when I was there at the weekend which meant I struggled to get the code to a place where I could access it on my laptop. Then, when I came to start the work I realised that I hadn't got all the resources I needed. For this reason I went past the office yesterday on my way over to the studio and got the resources which I needed.
 |
| Dehumidifier in Julian |
Upon arriving at the studio my first task was to pull the power over to the unit and set the dehumidifier running. My plan was to leave this running continually throughout both days to get as much of the moisture out of the ceiling as I possibly could.
 |
| Yep, cutting wood here |
With this done I got to work measuring the plywood boards for lining the bottom of the trailer. It turned out that I had bought exactly the correct amount of wood; I was able to cut one of the boards in two and make use of both halves to complete the tessellation.
 |
| The boards, laid out to prove it |
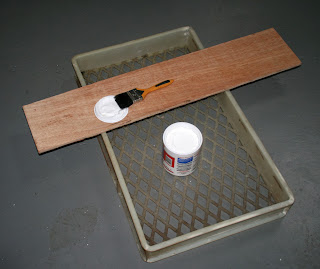
With the boards cut to shape I started the task of painting them with PVA to seal and waterproof them. This took bloody AGES but I just got myself into a routine and cracked on with it and after a couple of hours it was all done.
 |
| PVA, plastic tray and brush with wood |
I pulled some of the plastic trays out of the plastic wrapped stack and laid each board on them, thus keeping the glue covered wood off the floor. Once I had done all of one side, and the edges, I went back to the beginning and, turning them over, sealed the other side.
 |
| All the boards completed and drying |
This task completed I left them overnight to dry.
At this point I almost stopped and vegetated however I snapped myself out of the lethargy of post-food and decided to have a go at applying the sealant to at least part of Julian's roof, even if just to see how easily it went on and whether my plan would work.
 |
| Ready to work on the roof |
I set the arc lights pointing upwards and pulled the ladder round the side and the illumination was absolutely perfect to work on the roof. This alone is great to know however I did far more than just check how well I could see up there.
When I bought the sealant I also bought an applicator gun so I unpacked all my kit, including camera, and went up the ladder. After much effort squeezing the handle of the applicator I got the silicon to very near the end of the nozzle and then "crack" the handle bent in half!
 |
| The metal bent when I squeezed |
Whoops.
Fortunately I knew that we had another of these in the studio so I dashed over, grabbed that, and it was of much more sturdy construction and pretty quickly I was applying and spreading the silicon along the edge of the roof where the gap was obvious. The following pictures illustrate the technique which I had worked out before I even started. First of all I put a thick trail of the silicon along the target area, large blobs of it. Next I took the scraper and smoothed along the line, making the join continuous and filling in any holes and gaps which, if left, would make the whole exercise pointless.
 |
| Blobby squirt of silicon |
 |
| Smoothing with the scraper |
 |
| The smoothed silicon |
Once I got started I just didn't stop and I went right the way round the whole edge of the roof, squirting and spreading and squirting and spreading until I had sealed everything. What a great success, I really thought I wouldn't achieve this much in one afternoon.
 |
| The drips still in the cabin |
I decided not to sleep in Julian as I left the dehumidifier running through the night however the gales woke me in the night and about 4am I went downstairs and saw that the fuse had tripped out on the extension cable taking power to the other unit. I unplugged it, reset the fuse, and headed back to bed.
In the morning I was pleased that I was able to reconnect the power and it did not trip out again; the dehumidifier was on the job once again.
 |
| I bought all the fixings |
I went to B and Q and bought them out (literally) of the straight joint strips, and a load of bolts with nuts, with which to affix the boards onto the trailer.
 |
| Measuring and Drilling the holes |
I laid the first board top left of the trailer and for the first of many times headed under the trailer on my back and marked up where I wanted the bolt holes to be drilled. I then pulled the board onto the saw horses and drilled the first four holes. Next I took one of the plates and one bolt and worked out where the other hole needed to go, per fixing.
 |
| Measuring out the other hole |
The board, fully drilled, went back into it's place on the trailer bed and I set about fixing it. This was accomplished by first of all putting one of the flat joint strips on the top of the board and then pushing the bolts through so the protruded through underneath the trailer. Next I went back underneath the trailer and used another flat joint strip and the nuts and tightened them up as much as I could finger tight.
 |
| The top strip in place |
 |
| And the bottom strip attached |
It felt like I was crawling around on the floor under that trailer for hours (maybe because I was) but eventually I completed the task and all the boards were fixed into place.
 |
| The finished base on the trailer |
I had made a mistake on the last board, however, as you always do as you come towards the end of a task it's important to keep focused. Because the bottom left board is rotated compared to all the other ones (as you can see from the picture above) I drilled the secondary holes in the wrong place; vertically above rather than horizontally across.
 |
| Filled the hole with silicon |
After a little thinking I realised that I had that silicon gunk which I could use to fill these holes and so, as I was packing down ready to head off, I grab the gun and this worked really well. As I was driving home I realised I should have carried on and used the silicon to fill the gaps between the boards; I will have to do this first thing when I get back to the unit as I had hoped to start the process of packing the trailer up next time.
 |
| The water I collected |
The last thing I did before leaving was unplug everything and check the state of the dehumidifier. I was still seeing some moisture in the gap in the ceiling but much less than earlier and you can see from the picture just how much had been drawn out of the vehicle. I will be plugging this back in and running it as much as I possibly can whenever I am over there, to keep this process going.
So there you have it, I got loads done. I have another list for the next time I get over there though. I bought some multi-purpose waterproofing paint which I am going to apply across the whole of the roof and as mentioned earlier I also want to pack the trailer.
It is really becoming very real now and my fears are starting to build; have I got enough money (probably not) will I cope with the isolation (I think so) is this really a good idea (yes I think so) and all these thoughts are spinning round in my head. I think it'll only get worse up until that moment when I drive away from the studio for the last time.


I recognise the dehumidifier. I believe it's the one you borrowed from me about 5 years ago ;)
ReplyDeleteAhahah you know what it probably is. I thought you'd come and collected it ages ago, and Dan had bought a new one? Well, it is still working, and well; whenever you want to have it back, just come grab it ;) x
Delete