The bulk of this blog is going to be about my currently-under-way attempt to build the travel hutch for Sassy inside of Julian.
 |
| Electricity from the mains |
First of all a little update on the electricity saga. It turns out that the problem I am experiencing is down to the hookup cable and when I tried with the three point plug into an extension outside my house last night I managed to get the power working.
This is a really good thing but why the hell the camper van dude didn't use my equipment I do not know; he hasn't impressed me at all and I'm still in dispute with him about the amount he is trying to charge me.
 |
| Battery compartment now |
Anyway, the battery compartment is a little fuller than it was with the inverter and many more cables and wires in there. Everything seems to work apart from the air conditioning which is tripping the circuit breaker whenever I plug it in (let alone turn it on) which isn't a good sign. Hmmmm. I know this was working when I bought him so will have to get this looked at I think; feels a bit of a shame to have the box, and it not work.
Anyway, that is my update and now for the Sassy Travel Hutch saga.
 |
| The space for Sassy |
The first job was to measure up and sweep out as the measurements my business partner took made no sense at all.
 |
| Lots of dirt |
The amount of crap in the bottom of that gap was incredible; there was even a stone in there and so I got the dustpan and brush and swept it all out to make it clean ready for my work starting. All of this I did yesterday evening, after finding out the electricity was working.
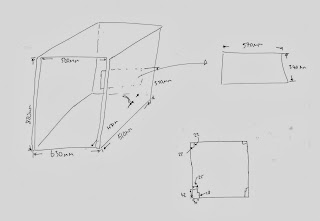
Once I had a clean space I took the tape measure and measured all the dimensions which I thought relevant. This was a little more complicated than I thought it would be as the space was not completely regular; there were a few little bits and sticky out places which I had to be aware of. I also measured the distance of the capped off gas pipe as I will be building a box around it.
 |
| The sketch I drew of the dimensions |
Once back inside I was able to take these dimensions and come up with an idea for how to build a frame which would give Sassy a nice area for her to sit, and also a dark area underneath.
 |
| Frame idea |
As you would expect these dimensions were changed as I actually started with the woodworking. I decided to lift the shelf up to about half way and also bring a frame forwards towards the front so the envisaged ramp could be easily mounted to a secure ledge.
 |
| Rough idea of blocked out hutch |
All this was achieved last night and today, after work, I popped over in Julian to B and Q and bought a pack of 2 x 1 and some right angle joints and set to.
 |
| The first cut.... |
First of all I measured the left and right horizontal batons and cut these; my saw was a bit blunt and i was not using a secure base to rest the wood on while cutting and this made things MUCH harder. My reason was that it had started raining and I didn't want to be outside with my saw horses and electric saw so just made do. In the end the cuts were alright, barring a few slight mistakes.
 |
| The left horizontal and left upright |
Once I had the horizontals I wedged them into the gap and then worked out exactly how high I wanted them. I cut these independently, with separate measures, using a builders level to try and make sure the whole platform would be as near to flat as possible.
 |
| The left hand frame in |
The left hand frame was the first to do as this was easiest for me to get to, being right handed.
 |
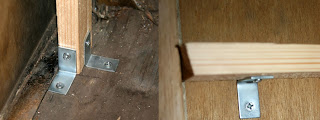
| Fixings |
I fixed the upright with two right angle joints and then, towards the other end, put another underneath the horizontal to act as a support. I used this method on the other side too, thought it was a bit tougher with my left hand operating the power driver.
 |
| Both side supports fitted |
Much swearing, and me finding out that the space was big enough to fit my hole body in, and I had this done; it wasn't actually that much hassle really and the fact I was measuring many times really helped I think; each length of wood was perfect.
Next I was fitting horizontal cross pieces and this was both easy and difficult. The rear one I fitted very easily with fixings on the near side....
 |
| Fixing the rear horizontal cross piece |
... however the front one was a pita as I had to try and screw through towards me. Not easy.
 |
| How I have left it |
In the end the last screw threaded itself and I am going to have to work out how to remove it and maybe screw that in with a manual driver.
For tomorrow I need to put one more cross piece in, but the position of that will be decided by the depth of the ramp. I will also be buying the wood for the panels to box it all off and use as the floor. I will not be able to fix this all, however, as I want to put the insulation behind it the rear wall and most of that will not be accessible. I should be able to do the bottom part though as I can fill the insulation from the access panel (which I will then nail shut).
So there you are; I did wood work.
 |
| Sassy Squidger |
I hope Sassy approves.


*applause*
ReplyDeleteWas it the RCD (in that white box, top left in the second image) that tripped? It's entirely possible the a/c could trip that without there being a fault. In the UK, regs require ALL circuits in caravans and campers to be RCD protected, so if that's been added as part of the project we can bypass it, if needs be.
On the other hand, if it is a circuit breaker tripping, there is an issue with the a/c that needs fixing.
Yes it was the RCD which tripped when the a/c plug was plugged in (with the a/c turned off).
DeleteThe a/c plug is on a cable which is butchered together; my thinking is there is more likely to be a problem with the taped join than the actual a/c.... or at least I hope so....
I'm gonna buy a circuit tester (actually gonna order it now) so I can check for a short in that cable.
I'm going to guess at a neutral to earth short. or a crossed neutral/earth connection in that joint!
ReplyDelete*nods knowingly* i'm about half way through the second chapter of the C&G electricians book :D I know electricicality, me
DeleteYou're going to a lot of effort for a nice first meal upon arrival.
ReplyDelete*shocked face*!!!!
DeleteFew jazzy question/suggestions?
ReplyDeleteIf Sassy lives in Julian won't Julian smell like rabbit? After your blog I have a confession to make...what if you have to live in Julian for a while.
If you haven't already, wouldn't it be useful to make the hutch for Sassy removable for ease of cleaning and potentially a stand so she could live outside for a while or is that harsh?
Just thinking out loud x
Thanks :)
DeleteSassy'll only be in for the journey; I'm taking her normal hutch and will give her a whole room to herself as soon as I arrive.
I'm building a framework which will be useable as a cupboard; my plans are to have removable trays so it's easily cleanable.
They are both good thoughts :) x